Architecture Diagrams#
This page describes the Jupyter Server architecture and the main workflows. This information is useful for developers who want to understand how Jupyter Server components are connected and how the principal workflows look like.
To make changes for these diagrams, use the Draw.io open source tool to edit the png file.
Jupyter Server Architecture#
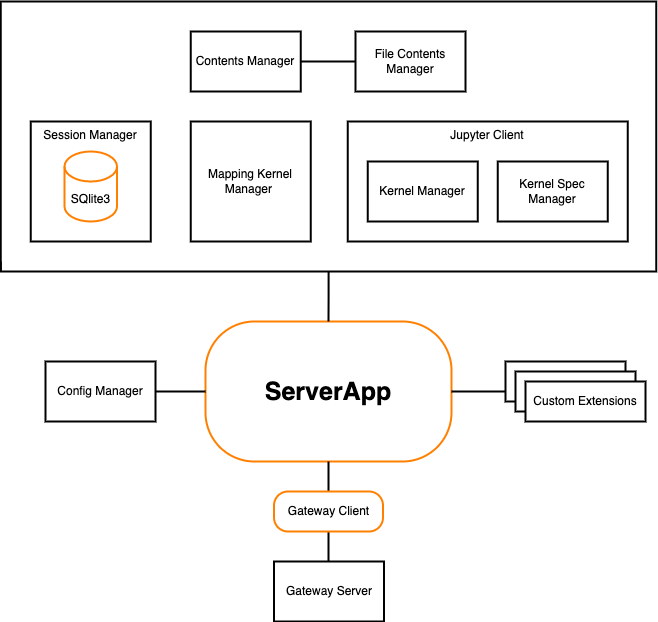
The Jupyter Server system can be seen in the figure below:

Jupyter Server contains the following components:
ServerApp is the main Tornado-based application which connects all components together.
Config Manager initializes configuration for the ServerApp. You can define custom classes for the Jupyter Server managers using this config and change ServerApp settings. Follow the Config File Guide to learn about configuration settings and how to build custom config.
Custom Extensions allow you to create the custom Server’s REST API endpoints. Follow the Extension Guide to know more about extending ServerApp with extra request handlers.
Gateway Server is a web server that, when configured, provides access to Jupyter kernels running on other hosts. There are different ways to create a gateway server. If your ServerApp needs to communicate with remote kernels residing within resource-managed clusters, you can use Enterprise Gateway, otherwise, you can use Kernel Gateway, where kernels run locally to the gateway server.
Contents Manager and File Contents Manager are responsible for serving Notebook on the file system. Session Manager uses Contents Manager to receive kernel path. Follow the Contents API guide to learn about Contents Manager.
Session Manager processes users’ Sessions. When a user starts a new kernel, Session Manager starts a process to provision kernel for the user and generates a new Session ID. Each opened Notebook has a separate Session, but different Notebook kernels can use the same Session. That is useful if the user wants to share data across various opened Notebooks. Session Manager uses SQLite3 database to store the Session information. The database is stored in memory by default, but can be configured to save to disk.
Mapping Kernel Manager is responsible for managing the lifecycles of the kernels running within the ServerApp. It starts a new kernel for a user’s Session and facilitates interrupt, restart, and shutdown operations against the kernel.
Jupyter Client library is used by Jupyter Server to work with the Notebook kernels.
Kernel Manager manages a single kernel for the Notebook. To know more about Kernel Manager, follow the Jupyter Client APIs documentation.
Kernel Spec Manager parses files with JSON specification for a kernels, and provides a list of available kernel configurations. To learn about Kernel Spec Manager, check the Jupyter Client guide.
Create Session Workflow#
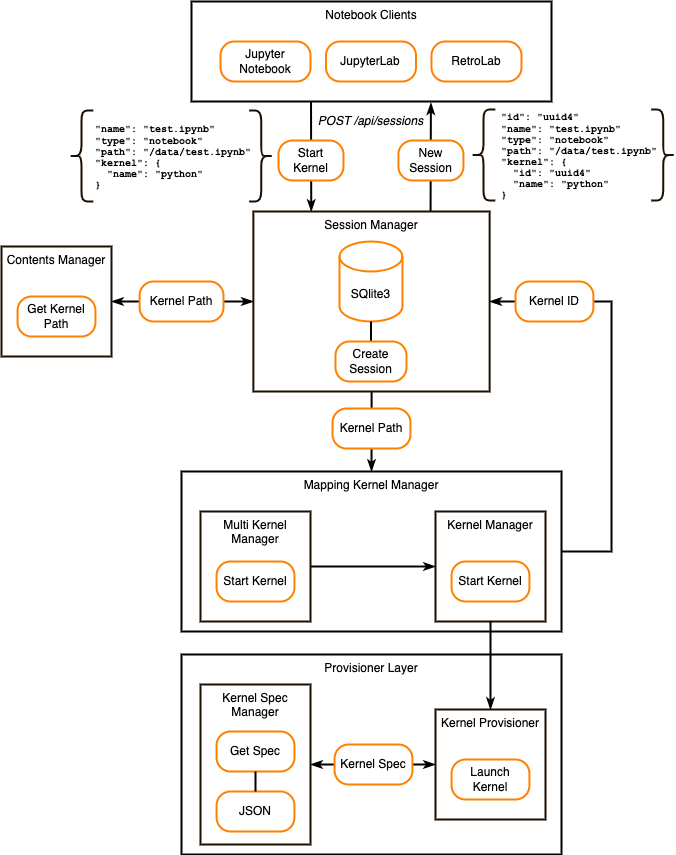
The create Session workflow can be seen in the figure below:

When a user starts a new kernel, the following steps occur:
The Notebook client sends the POST /api/sessions request to Jupyter Server. This request has all necessary data, such as Notebook name, type, path, and kernel name.
Session Manager asks Contents Manager for the kernel file system path based on the input data.
Session Manager sends kernel path to Mapping Kernel Manager.
Mapping Kernel Manager starts the kernel create process by using Multi Kernel Manager and Kernel Manager. You can learn more about Multi Kernel Manager in the Jupyter Client APIs.
Kernel Manager uses the provisioner layer to launch a new kernel.
Kernel Provisioner is responsible for launching kernels based on the kernel specification. If the kernel specification doesn’t define a provisioner, it uses Local Provisioner to launch the kernel. You can use Kernel Provisioner Base and Kernel Provisioner Factory to create custom provisioners.
Kernel Spec Manager gets the kernel specification from the JSON file. The specification is located in
kernel.jsonfile.Once Kernel Provisioner launches the kernel, Kernel Manager generates the new kernel ID for Session Manager.
Session Manager saves the new Session data to the SQLite3 database (Session ID, Notebook path, Notebook name, Notebook type, and kernel ID).
Notebook client receives the created Session data.
Delete Session Workflow#
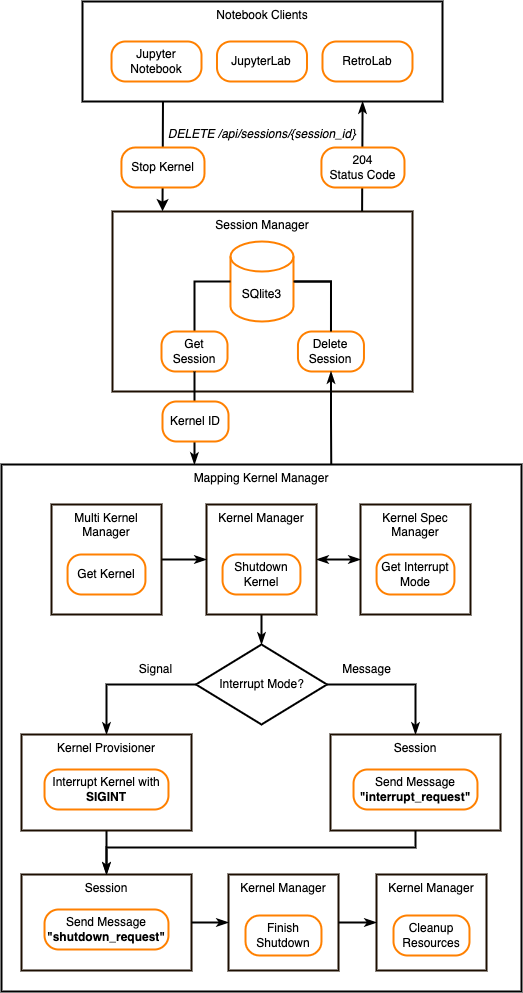
The delete Session workflow can be seen in the figure below:

When a user stops a kernel, the following steps occur:
The Notebook client sends the DELETE /api/sessions/{session_id} request to Jupyter Server. This request has the Session ID that kernel is currently using.
Session Manager gets the Session data from the SQLite3 database and sends the kernel ID to Mapping Kernel Manager.
Mapping Kernel Manager starts the kernel shutdown process by using Multi Kernel Manager and Kernel Manager.
Kernel Manager determines the mode of interrupt from the Kernel Spec Manager. It supports
SignalandMessageinterrupt modes. By default, theSignalinterrupt mode is being used.When the interrupt mode is
Signal, the Kernel Provisioner interrupts the kernel with theSIGINToperating system signal (although other provisioner implementations may use a different approach).When interrupt mode is
Message, Session sends the “interrupt_request” message on the control channel.
After interrupting kernel, Session sends the “shutdown_request” message on the control channel.
Kernel Manager waits for the kernel shutdown. After the timeout, and if it detects the kernel process is still running, the Kernel Manager terminates the kernel sending a
SIGTERMoperating system signal (or provisioner equivalent). If it finds the kernel process has not terminated, the Kernel Manager will follow up with aSIGKILLoperating system signal (or provisioner equivalent) to ensure the kernel’s termination.Kernel Manager cleans up the kernel resources. It removes kernel’s interprocess communication ports, closes control socket, and releases Shell, IOPub, StdIn, Control, and Heartbeat ports.
When shutdown is finished, Session Manager deletes the Session data from the SQLite3 database and responses 204 status code to the Notebook client.